")

Yogurt Cheesecake is the kind of no-bake dessert that feels almost too easy to be real. Just Greek yogurt, cookies, and a few hours in the fridge, and you get a creamy, set dessert that tastes surprisingly close to the real thing. I stumbled across this viral Japanese recipe and could not believe how well it actually works.
The first time I made this Yogurt Cheesecake, I used Biscoff cookies and full-fat Greek yogurt with a little cream cheese stirred in. What came out of the fridge the next morning had a smooth, thick texture that genuinely reminded me of a chilled cheesecake slice. It is light, it is creamy, and it takes almost no effort to pull together. This is about to become your new favorite!
Table of Contents
Ingredients for Yogurt Cheesecake
I always reach for a thick, higher-fat Greek yogurt when making this because the fat content is what gives the Yogurt Cheesecake its dense, creamy texture. Here is everything you need:
- 1 1/2 cups plain or flavored Greek yogurt (5% fat recommended, minimum 2% fat) – I recommend full-fat for the richest, most cheesecake-like result
- 2 tablespoons cream cheese (optional) – My preference is to always include it since it adds a noticeably richer flavor and firmer set
- 12 to 16 Biscoff or coconut sable cookies – In my experience, Biscoff gives the best flavor and texture absorption
- 1 teaspoon lemon juice (optional)
- 1 1/2 teaspoons vanilla extract (optional)
- 1 tablespoon honey or maple syrup (optional, to taste) – I usually add a small drizzle if the yogurt is on the tangy side
- 1 to 2 tablespoons jam (optional)
Optional Toppings: honey, jam, berry compote, fresh fruit, cocoa powder, crushed cookies
Step-by-Step Instructions
I recommend tasting your yogurt before you start because the flavor of the final dessert depends almost entirely on the yogurt you choose. Pick one that is mild, not overly sour, and thick enough to hold its shape.
Step 1: If using cream cheese, add it to the Greek yogurt and whisk until completely smooth with no lumps. This step takes about 1 to 2 minutes by hand. Add any sweetener, vanilla, lemon juice, or other flavoring now and stir to combine.
Step 2: Spoon the yogurt mixture into your serving bowl or container, spreading it into an even layer.
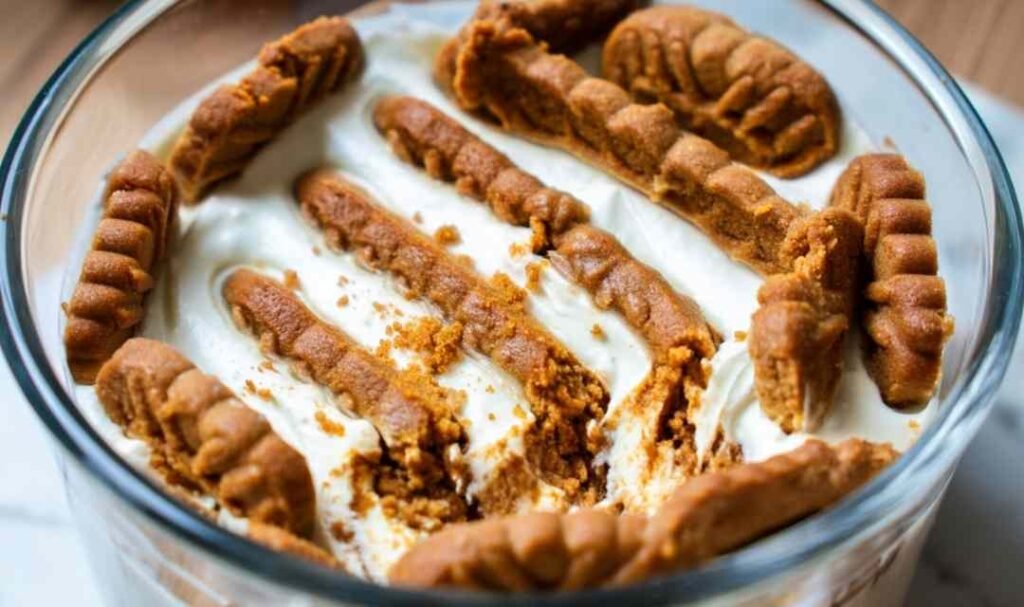
Step 3: Press the cookies upright into the yogurt, leaving about 1/4 inch of space between each one. Arrange a few cookies around the edges too, pressing them firmly in. Leave about 1/2 inch of each cookie sticking above the yogurt surface so the tops stay slightly crisp. The more cookies you use, the thicker and sweeter the final result.
Step 4: Cover the container tightly and refrigerate for at least 6 hours, or overnight for the best set. Do not rush this step. The cookies need time to absorb moisture from the yogurt and the whole thing needs to firm up properly.
Step 5: When ready to serve, run a thin spatula around the edges and flip onto a plate to unmold, or simply enjoy it straight from the container. Add your favorite toppings right before serving.
Best Ways to Enjoy Yogurt Cheesecake
This dessert is light and creamy on its own, but a few simple pairings and companion recipes make it even more of a treat.
Fresh Berry Compote: A warm or room-temperature berry compote spooned over the cold Yogurt Cheesecake adds a gorgeous color contrast and a bright, jammy flavor that cuts through the richness of the yogurt base.
Protein Banana Pudding: If you love creamy, no-bake high-protein desserts, this protein banana pudding is another easy make-ahead option that pairs well on a dessert spread or satisfies a sweet craving without much effort.
Protein Cheesecake: For a more structured, higher-protein cheesecake experience, this protein cheesecake is a natural companion recipe to explore right after making this yogurt version.
Protein Greek Yogurt Cookies: If you have leftover Greek yogurt after making this recipe, these protein Greek yogurt cookies are a smart and satisfying way to use it up with minimal ingredients.
Lemon Raspberry Cottage Cheese Bake: For another creamy, fruit-forward no-bake style dessert that uses similar high-protein dairy ingredients, this lemon raspberry cottage cheese bake is a bright and refreshing option worth bookmarking alongside this one.
Baked Blueberry Cottage Cheese Bowls: If you enjoy the simplicity and creamy texture of this Yogurt Cheesecake, these baked blueberry cottage cheese bowls offer a warm, baked version of the same high-protein, fruity dessert concept.
How to Store and Serve Yogurt Cheesecake
Store any leftover Yogurt Cheesecake covered tightly in an airtight container in the refrigerator for up to 3 to 4 days. The texture actually improves slightly on day two as the cookies continue to soften and fully meld into the yogurt. Do not freeze this dessert since the texture breaks down and becomes watery when thawed.
This dessert is best served cold, straight from the fridge. I recommend adding any fresh toppings like fruit, compote, or a honey drizzle right at serving time rather than storing them on top. Wet toppings added too early can make the surface of the yogurt soggy.
Pro tip: if you want individual portions, use ramekins or small glass jars instead of one large bowl. They set just as well, look more elegant when served, and make the Yogurt Cheesecake easy to grab straight from the fridge for a single serving.
Conclusion
This Yogurt Cheesecake proves that a creamy, satisfying dessert does not need an oven, a long ingredient list, or hours of effort. Just two main ingredients and a little patience in the fridge, and the result genuinely surprises people every time. Try it this week and see for yourself just how good simple can be.
2-Ingredient Yogurt Cheesecake
Ingredients
Equipment
Method
- If using cream cheese, whisk it together with the Greek yogurt until completely smooth, about 1 to 2 minutes. Add any sweetener, vanilla, or lemon juice and stir to combine.
- Spoon the yogurt mixture into your serving container and spread into an even layer.
- Press cookies upright into the yogurt, leaving about 1/4 inch of space between each one. Add a few around the edges. Leave about 1/2 inch of each cookie sticking above the surface.
- Cover tightly and refrigerate for at least 6 hours or overnight until fully set.
- Run a spatula around the edges and flip onto a plate to unmold, or serve straight from the container. Add toppings right before serving.


")