")

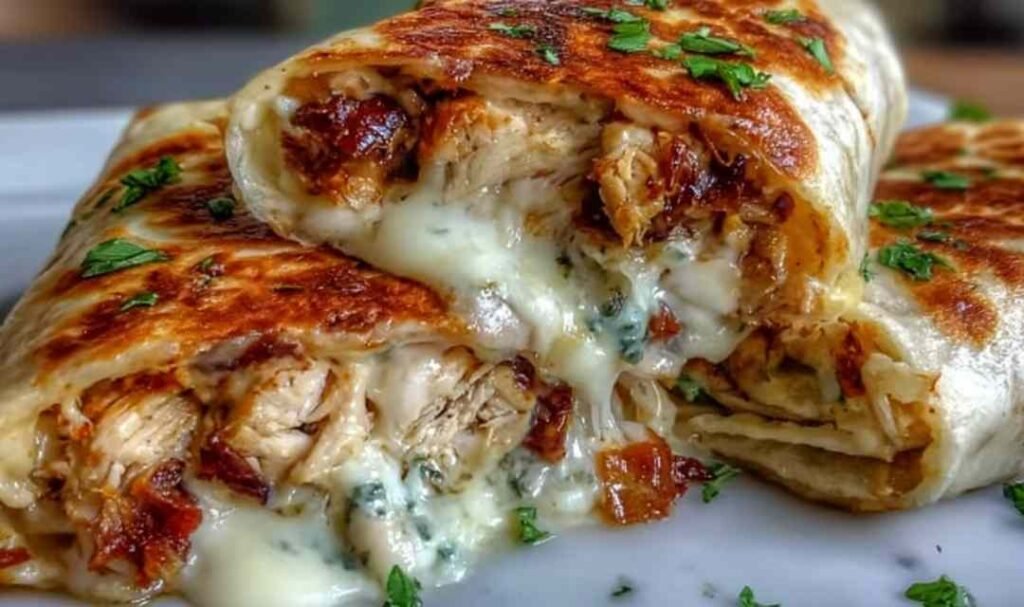
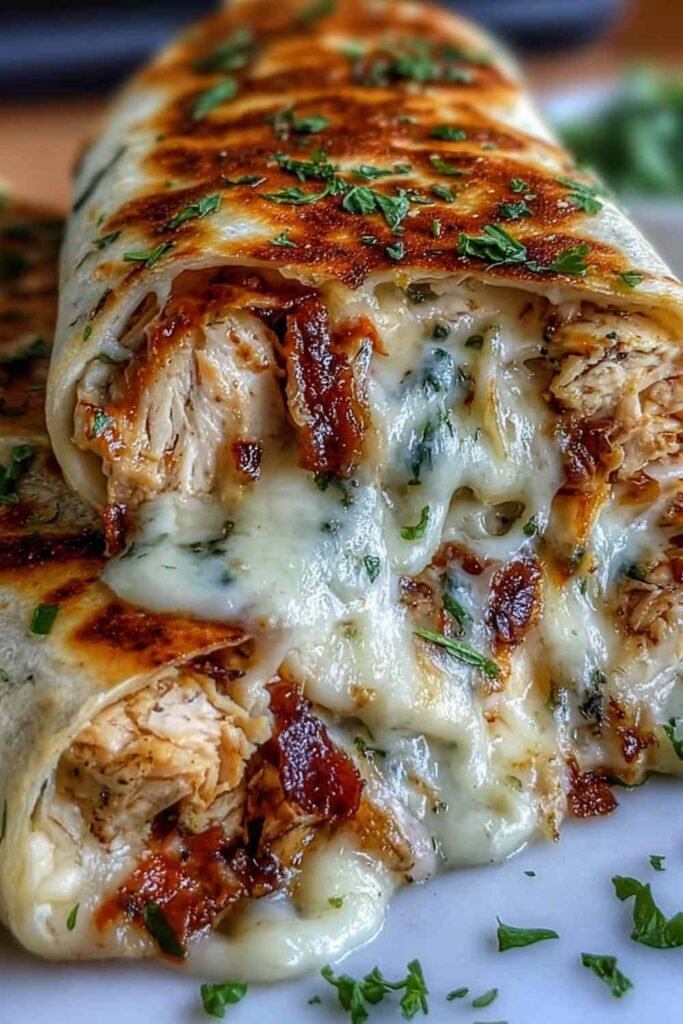
Low Carb Cheesy Garlic Chicken Wraps are the kind of dinner that saves a weeknight without sacrificing any flavor. Shredded chicken, three melted cheeses, and fresh garlic all rolled into a crispy low-carb tortilla, this is comfort food that fits your goals. I reach for this recipe when I need something fast, filling, and genuinely satisfying.
There is something about the smell of garlic hitting a warm skillet that makes the whole kitchen feel welcoming. These Low Carb Cheesy Garlic Chicken Wraps came together one night when I had leftover rotisserie chicken and a craving for something cheesy and crisp. The filling is rich and garlicky, the tortilla gets golden and crunchy on the outside, and the whole thing is on the table in 30 minutes. It has become one of those reliable weeknight meals I keep coming back to.
Table of Contents
Ingredients for Low Carb Cheesy Garlic Chicken Wraps
Every ingredient here pulls its weight, and I always keep most of these on hand for exactly this kind of dinner. I recommend using freshly minced garlic rather than jarred for the best flavor payoff.
- 2 cups cooked chicken breast, shredded
- 1/2 cup shredded mozzarella cheese (I prefer low-moisture for better melt)
- 1/2 cup shredded cheddar cheese (sharp cheddar adds the most flavor, in my experience)
- 1/4 cup cream cheese, softened (leave it out at room temp for 20 minutes before mixing)
- 2 cloves garlic, minced fresh
- 1 tbsp fresh parsley, chopped
- Salt and pepper, to taste
- 4 large low-carb tortillas (I recommend Mission Carb Balance or a certified gluten-free brand if needed)
- 1 tbsp olive oil
Step-by-Step Instructions
I recommend reading through all the steps once before you start. The process moves quickly, and having everything prepped ahead makes it smooth and stress-free.
Step 1: Preheat a skillet or grill pan over medium heat. Add the olive oil and swirl it to coat the surface evenly. You want the pan hot before the wraps go in.
Step 2: In a medium bowl, combine the shredded chicken, mozzarella, cheddar, softened cream cheese, minced garlic, parsley, salt, and pepper. Mix until everything is fully incorporated and the cream cheese is evenly distributed. If the cream cheese is still cold, it will clump and not mix well, so do not skip the softening step.
Step 3: Divide the filling into 4 equal portions. Spoon each portion onto the center of a tortilla and roll it up tightly, folding the sides in first if your tortilla is large enough. A secure roll prevents the filling from spilling during cooking.
Step 4: Place each wrap seam-side down in the hot skillet. Cook for 2 to 3 minutes per side until the tortilla is golden brown and the cheese inside is fully melted. Press down gently with a spatula for even contact.
Step 5: Remove from the skillet, slice each wrap diagonally in half, and serve hot. Garnish with a little extra fresh parsley if you like.
Perfect Pairings for Low Carb Cheesy Garlic Chicken Wraps
The best sides for Low Carb Cheesy Garlic Chicken Wraps are ones that add freshness or crunch to balance the rich, cheesy filling.
Crisp Green Salad: A simple salad with romaine, cucumber, and a light vinaigrette cuts through the richness perfectly and keeps the meal keto-friendly. For a heartier option, try this Healthy Avocado Chicken Salad on the side.
Guacamole or Sour Cream: Both are classic, low-carb dipping options that complement the garlic and cheese flavors beautifully.
Spicy Chicken Salad: If you want to keep the protein high, this Spicy Chicken Salad works as a fresh, bold side that pairs well with the warm wraps.
Roasted Vegetables: Simple oven-roasted zucchini or bell peppers add color and texture without adding carbs. For a flavor-packed vegetable side, these Roasted Potatoes with Baked Feta and Garlic are a crowd-pleaser.
Keto Dipping Sauce: A creamy ranch or sriracha mayo dipping sauce takes these wraps to the next level for a game-night or casual dinner spread.
How to Store and Reheat These Wraps
These wraps are best enjoyed right off the skillet when the tortilla is crispy and the cheese is melted and gooey. If you have leftovers, let them cool completely and store them in an airtight container in the refrigerator for up to 3 days.
To reheat, I recommend placing them back in a dry skillet over medium heat for 2 to 3 minutes per side. This brings back the crispy exterior much better than a microwave, which makes the tortilla soft and chewy.
Pro tip: if you are meal prepping, store the filling separately and assemble fresh wraps when ready to eat. The filling keeps well for 3 days and comes together quickly on a busy night.
Conclusion
These Low Carb Cheesy Garlic Chicken Wraps are proof that a satisfying, keto-friendly dinner does not have to be complicated. With simple ingredients and one skillet, you get a golden, cheesy, high-protein meal in just 30 minutes. Give them a try tonight and see why this one keeps showing up on the weekly rotation.

Low Carb Cheesy Garlic Chicken Wraps
Ingredients
Equipment
Method
- Preheat a skillet or grill pan over medium heat. Add the olive oil and swirl to coat the surface evenly. Allow the pan to heat fully before adding the wraps.
- In a medium bowl, combine the shredded chicken, mozzarella, cheddar, softened cream cheese, minced garlic, parsley, salt, and pepper. Mix until fully incorporated and the cream cheese is evenly distributed. Make sure the cream cheese is fully softened before mixing to avoid clumping.
- Divide the filling into 4 equal portions. Spoon each portion onto the center of a low-carb tortilla and roll up tightly, folding in the sides as you go to form a secure wrap.
- Place each wrap seam-side down in the hot skillet. Cook for 2 to 3 minutes per side until the tortilla is golden brown and the cheese inside is fully melted. Press down gently with a spatula for even browning. Do not move the wraps too early or they may unfold.
- Remove from the skillet, slice each wrap diagonally in half, and serve immediately while hot. Garnish with extra fresh parsley if desired.


")